As mentioned in this article:
2025 The most comprehensive custom enamel magnets process analysis (1)
Nwe process for custom make enamel magents
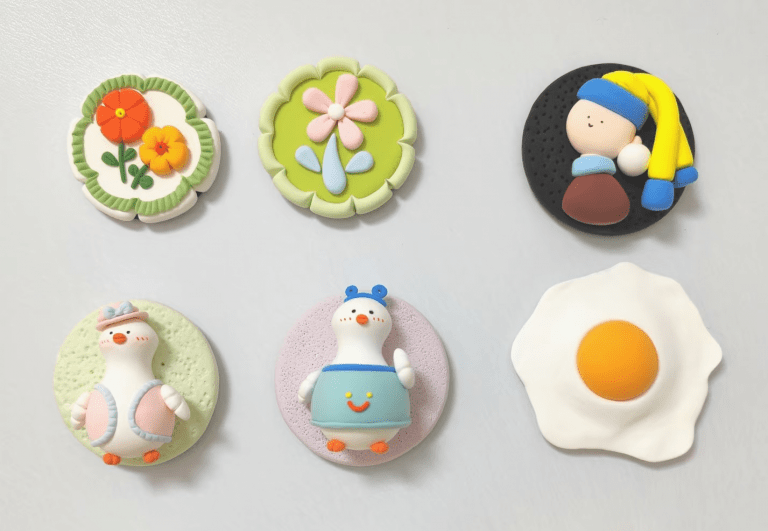
Clay Fridge Magnets
Materials: 1. Soft clay, polymer clay – requires baking in an oven to set.
2. Stone plastic clay, air-drying clay – has a texture similar to soft clay but does not require baking.
3. Resin clay / ultra-light clay: lighter in weight, can be air-dried or heated in a microwave for setting.
4. Acrylic paints, tools (shaping knives, rolling pins, molds), magnets, strong glue.
Production method
Shaping: Use hands or tools to shape, roll, and carve the clay into the desired shape (flat or three-dimensional).
(Optionally) Combine/ Add details: You can combine different colored clays or add small components.
Setting:
1)Soft clay: Place in an oven and bake according to the instructions at the specified temperature and time to harden.
2)Stone plastic / resin / ultra-light clay: Place in a ventilated area to air-dry and harden (a longer time is required).
3)Polishing: After drying or baking, use sandpaper to polish the surface to make it smooth (especially for stone plastic clay).
4)Painting: Use acrylic paints to draw patterns or color the hardened clay surface.
5)(Optionally) Glossing: Apply varnish or matte oil to protect the color and increase the texture.
Advantages: The design freedom is extremely high, allowing for the creation of unique three-dimensional works with a strong handcrafted feel and high artistic value. Different clays have different textures and properties (for example, stone plastic clay can be polished to have a stone-like texture).
Disadvantages: The production efficiency is low for manual work, making it unsuitable for large-scale production; it requires a certain foundation in art and manual skills; drying or baking takes time; the finished product may be heavy (especially if it is solid); the adhesion strength of magnetic iron needs to be noted.
Magnetic force: It depends on the size and strength of the magnetic iron being attached.
wooden fridge magnet
Making wooden fridge magnets is both simple and fun, perfect for craft enthusiasts or family activities! Here is a detailed guide on the process, from material preparation to final completion:
1. Design and Cutting:
On the wood piece, draw the desired shape outline with a pencil (or attach a printed template).
Safety first! Use the appropriate saw and carefully cut along the drawn lines. When operating power tools, be sure to wear safety goggles and secure the wood.
For thin wood pieces or popsicle sticks, sharp knives or scissors can also complete the cutting.
2. Polishing and shaping: Use coarser sandpaper (such as 180 grit) to remove the burrs and uneven areas at the cutting edges.
Use finer sandpaper (such as 240 grit or 320 grit) to polish the entire surface and edges, making them smooth and round, with a comfortable touch. Pay special attention to rounding the corners to avoid scratching the hand.
After polishing, use a brush or dry cloth to remove all wood chips and dust.
3. Decoration and Beautification (This step can be carried out before or after attaching the magnets):
Coloring/Painting:
* If a base color is needed, apply acrylic paint evenly and let it dry.
* Use a pencil to lightly sketch the outline.
* Use acrylic paint, markers, etc. for painting, writing, or creating patterns. Multiple layers of coloring may be necessary to achieve the desired effect, and each layer must be dry before proceeding to the next.
* Use masking tape to create clear color boundaries.
* Attach Decorations: Use strong glue or hot melt glue to attach beads, sequins, dried flowers, etc. to the wood pieces.
* Transfer Patterns: Follow the instructions for the transfer medium such as Mod Podge (usually glue – apply – dry – wipe off the paper backing).
* Natural Wood Grain: If you prefer the natural wood grain, skip the painting and directly apply clear varnish or wood wax oil.
4. Apply protective coating (optional but highly recommended):
After the paints and glues have completely dried (usually requiring several hours or even overnight), apply 1-2 coats of water-based varnish or wood wax oil.
Apply thinly and evenly, avoiding runny areas. Wait for each layer to dry completely before applying the next layer (refer to the product instructions for drying time).
This protective layer can prevent water and stains from penetrating, keeping the color brighter and the wood more durable.
5. Attach the magnet (the crucial step!) :
6. Positioning: Place the magnet on the back of the wood piece (usually at the center or scattered in the corners), and mark the position lightly with a pencil.
Clean surface: Use a cotton swab dipped in a small amount of alcohol to clean the wood piece and the magnet surface at the marked area (if the magnet has a coating), ensuring there is no oil or dust.
Attachment:
Strong glue: Drop a small amount of glue on the magnet surface (or at the marked area of the wood piece), do not use too much to prevent overflow. Press the magnet quickly to the marked position and hold it firmly for at least 30 seconds to 1 minute (depending on the glue instructions). Then lay it flat and let it rest to allow the glue to fully cure (usually it takes several hours or even 24 hours, be sure to follow the glue instructions).
7. Final inspection and usage:
Ensure that all the glue (especially at the magnet area) is completely dry and cured.
Gently shake or try to twist the magnet to check if it is firmly attached.