Custom Badge Production Process & Professional Guidelines
1. Demand Communication and Confirmation
Collaborate with the manufacturer to clarify core customization parameters:
Application Scenario & Budget**: Specify the badge’s purpose (e.g., fan support, brand promotion, event commemoration) and budget range.
Process Type: Confirm the preferred production process (e.g., cloisonné enamel, imitation enamel, screen printing, or other techniques).
Dimensional & Material Specifications: Define the badge’s shape (circular, irregular, etc.), size (e.g., diameter in millimeters), and base material (e.g., brass, zinc alloy).
Volume & Lead Time: Confirm the order quantity and required delivery date.
Outcome: Customization requirements finalized.
2. Design Draft & Vectorization
Translate conceptual ideas into actionable design files:
Design Proposal Submission: Provide visual references (e.g., reference images, hand-drawn sketches) or detailed textual descriptions to convey design intent.
Vector Graphic Development: The manufacturer’s design team will create standardized vector files (in AI/CDR format) based on the draft. Vectorization is a critical prerequisite—mold fabrication cannot proceed without vector graphics.
Outcome: Vector design confirmed.
3. Mold Fabrication
Produce the core tooling for mass production:
Mold Engraving: Using precision CNC engraving machines, the manufacturer carves the badge’s pattern onto mold steel, which serves as the foundation for subsequent stamping.
Cost Notes: A one-time mold fee applies (may be offset or refunded for large-volume orders). Reorders of the same design will not incur additional mold costs.
Uniqueness: Each distinct design requires a unique mold.
Outcome: Mold engraving completed.
4. Sample Validation
Verify physical feasibility before mass production:
Sample Production: The manufacturer will produce 3–5 physical samples for review.
Inspection Focus: Evaluate whether the sample aligns with expectations in terms of material, color accuracy, process execution, and detail fidelity.
Criticality: Sample validation is strongly recommended—it is the final opportunity to identify and rectify defects. Mass production commences only after sample approval.
Cost Notes: A sample fee is typically charged, which may be offset or refunded upon bulk order confirmation.
Outcome: Sample confirmed.
5. Mass Production
Execute large-scale manufacturing via standardized processes:
1.Stamping: Use the mold to press the badge’s outline and pattern onto metal sheets.
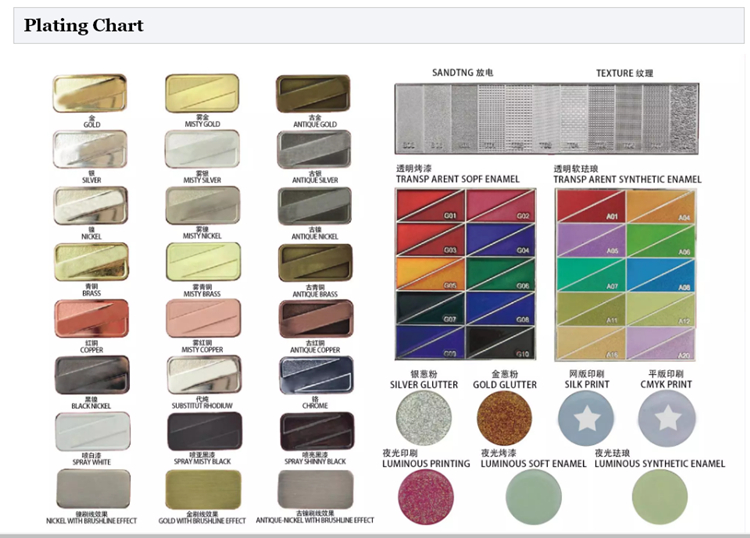
2. Electroplating: Apply surface treatments (e.g., gold plating, silver plating, antique copper plating) to the metal blanks.
3. Coloring:
– Cloisonné/imitation enamel: Fill recessed areas with enamel glaze or resin.
– Baking paint: Fill grooves with colored paint and cure via high-temperature baking.
4. Polishing/Grinding: Smooth the surface for a refined finish.
5. Protective Coating: Apply an anti-oxidation electroplating layer to prevent discoloration.
6. Attachment Welding: Affix back accessories (e.g., pins, magnets).
→ Outcome: Mass production completed.
6. Quality Control & Shipment
Ensure compliance and deliver the final product:
Quality Inspection: Conduct full or random sampling inspections to verify dimensional accuracy, color consistency, and structural integrity.
Packaging & Shipping: Package products per requirements (e.g., individual OPP bags, bubble wrap, card backing) and arrange shipment.
Outcome: Shipment dispatched post-inspection.
Process Overview
Idea Initiation → Demand Alignment → Vector Design Confirmation → Mold Fabrication → Sample Validation → Mass Production → QC & Shipment
Professional Recommendations
Budget Allocation: Include potential costs for design, mold fabrication, and sampling in the total budget.
Lead Time Planning: The entire process typically takes 10–20 working days (varies by design complexity). Reserve sufficient time for event-related orders.
Manufacturer Selection: Partner with a reputable supplier that provides end-to-end communication and professional technical guidance.